Big John Duffel Bag
“Dear John”
I think this may have been the biggest undertaking I have ever done in bag making. The pattern I chose is the John Duffel from Uh Oh Creations. The pattern has 3 sizes: small, medium and large. I went with the largest or Big John. There are also some hacks available from the designer in a blog post. From these options, I chose to add an outside zipper pocket in the front and slip pockets at either end.
The Prep
I thought I was losing my mind with cutting such large pieces! But, before I even started, I knew it was going to be a big job so I was ready.
I decided to re-watch LOTR Fellowship of the Ring in the background – its been probably over 10 years since I last watched any of them.
Oh, how had I forgotten how truly stunning these movies are and the music too – absolutely wonderful! The scene with Aragorn and Arwen on the bridge at Rivendell; the death of Boromir, lighting the beacons; the riders of Rohan; the Ent’s march, Pippin’s song before the battle at Gondor! Phew. I’m not sure if I paid too much attention to the movies, but I ended up watching all 3 LOTR movies to the end, AND I still had NOT FINISHED CUTTING and preparing the pieces for the Big John Duffel! In the end, all was cut and fused. Time to move forward.

Fabric Selection
I made this bag as a special request (and Christmas present), so my choices were not all my own. It needed to be ALL black with a specific red & black lining fabric. For the exterior, I used the black Army Duck Waxed Canvas from Emmaline Bags. I have worked with it before, so I know how incredible it is to sew with. Also, it is perfect for a classy duffel.
The lining fabric I chose is a 44″ wide woven cotton. The Alexander Henry design called “After Dark in Red” from Lakeview Fabrics in Toronto. I’m glad I ordered extra as I used the lot! As I had the fabric spread out on my table for cutting, Hub walked by and wowed at the fabric. It really is nice and full of interesting images.
Hardware
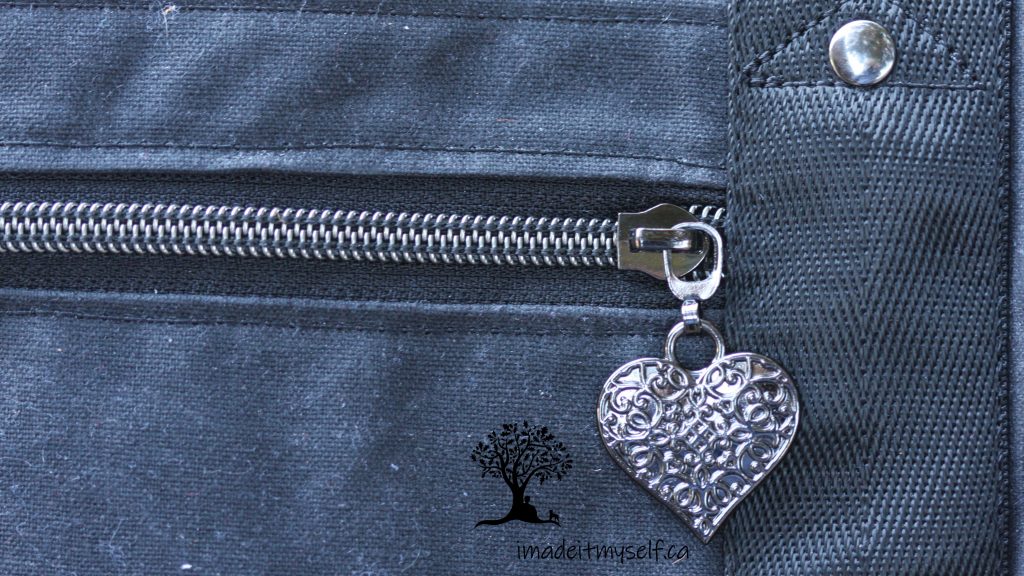
Hardware had to be the gunmetal finish to go well with the solid black exterior. I was thinking about using all black hardware, but the Atelier Fibre Arts (great Canadian source of matte black hardware) website was on a moving break and I needed to get started.
Gunmetal Finish is Phenomenal
It was my first time with using gunmetal and whoa, this finish is really beautiful! I had to get rivets, zipper pulls, zipper tape, triangle D-rings, a strap adjuster, strap ends, snap hooks all in gunmetal at 1.5″ width. In addition, I used seat belt webbing from Blue Calla and of course their medium woven interfacing that I just love. It adheres even faster and more consistently now! I used pellon thermolam fusible fleece for the exterior pieces and fusible foam for the shoulder strap. Also had to buy some black Velcro since I only had white in my supplies.
I added the fusible fleece to all the exterior pieces and medium woven interfacing on all cotton – all the lining. Phew!
The Making of the Duffel
First up is the strap and shoulder pad. It was really fun to construct and so I started on a high note.
Not sure how I missed it in the cutting list, but I didn’t cut enough webbing. I needed one long strap but also the two shorter pieces for the handles which I only just had enough to squeeze out. It is obvious now in retrospect, but I almost messed up. The webbing I used was just wonderful. Smooth and felt like quality. I attached metal strap ends and rivets and I think it looks incredible.
Next up were the side pockets. They are built like two complete small bags with construction and then birthing like a full bag. I did the hand sewing on sealing up the turning gap which was quite easy with the fabrics I used.

On to the exterior. Again, I found the instructions very good with exact measurement for strap placement. I incorporated a front zipper pocket and found it was such a great addition.
Uh Oh…
Both sides done and on to the interior. This is where it started to get a little hairy for me. The lining came together well, but once I started sewing it to the exterior, I actually broke a needle (I was using a 14, but replaced with a 16 and no further issues).
At about this point, I was getting so frustrated that I thought I might walk away from it. The whole thing was getting so bulky and awkward. I couldn’t seem to maneuver it properly and had to keep repositioning my machine further away from the wall. Obviously, though, I kept going, but I was getting rather cranky. I almost thought of giving up, when hey presto it was done! Just like that.
In the end, this bag seemed to be prep, prep, prep. Make strap, make front exterior, make side pockets, make lining…then presto. Done.
Just look at the result! I am so pleased with it!
Now I DO want to make another – funny ole world.

PostScript
I decided that I do need video tutorials! It is not just the instructions – although that helps. I like to have someone along with me who has already made it. Encouraging me perhaps, reminding me to watch those seam allowances and stitch lengths and showing me what the instructions actually mean. There is exactly one video tutorial for the John Duffel and it missed the mark for me. Much of it was done on either an industrial or a cylinder arm sewing machine that is so frustrating to watch as I struggled. Still, it was better than nothing and she produced a wonderful bag.
I could also mention that I toyed with the idea of using vinyl for the base pieces, but I’m really glad I didn’t in the end because, well:
1. I don’t think my Juki TL-2010Q could have done it; and,
2. The waxed canvas fabric is really enough for the entire exterior.
So, dear John, let’s be friends although I may see other bags too.